A lithophane is in essence a 3D image. Here I explore reducing it to simply 2 tones so I end up with what looks like a block engraving that can be used (for example) to print on card.
Or so I hope.This is an experiment in progress with limited success so far. But I do feel most of the problems now lie in my inability to block print rather than in making the block on my trusty Ender 3.
Lithophane Background
Lithophane images are usually printed as a number of thicknesses. Usually the darker parts of the image are the thicker sections of the lithograph but you can change this to be the reverse. The effect is that the image literally stands-out from the background.
By changing your viewing angle it is as if you were moving around a real 3D object. Lithophanes have been around for a very long time and today, due to their 3D-ishness make great projects to print on a 3D printer.
Lithophane as a Block Engraving
It occurred to me that one of the possibilities here is to use a 3d printed lithophane as block engraving of the image. Basically take an image, render it down to two tone black and white and use that to make the lithophane. Print the lithophane on a 3D printer and you should end up with a printing stamp.
I plan to deal with a number of ways to produce a lithophanes in the future but arguably the simplest and easiest is to use some code produced by the guy who runs this site called 3dp.rocks.
All you have to do is download your image to the above webpage and it will produce a lithophane as an STL file. It is a really great tool. And free. You can show him some love by clicking on an advert or two or doing a patreon donation but I’ll leave that up to you.
As far as I know, not only is it free but it doesn’t actually run on anyone else’s machine than yours! (it’s a JavaScript app) So if you like, spark it up, then disconnect from the internet. It should still work OK.
My first attempt at a Lithophane printing block was not too successful. I think I got a bit carried away and the image was too complex. It “sort of” worked as a printing stamp and proved the concept but was not really a success. Simplicity is the key.
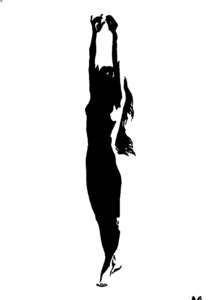
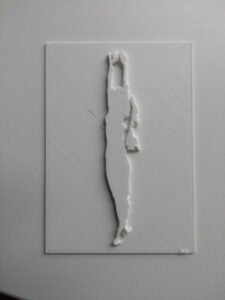
The second attempt was to take this rather lovely silhouette and use that. It worked better but I obviously had not got rid of all the spurious noise on the image. The result is a lot of trailing PLA “snot” which needed removing. But even then I had difficulty using it to print.
The big problem here appears to be that the paint I use as the wash to use the lithophane for printing doesn’t “like” PLA. So maybe I need to put a layer of latex on it first before putting the paint on? I don’t know. I need to find out.
A Work In progress
So, it’s a work in progress. But I feel that this SHOULD work. More in later posts. I think tonight I’m going to read up on how to block print!
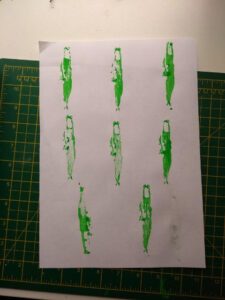
Here is the printing block after the snot was removed and what it produced. Clearly there still is work to be done and/or lessons to be learned.