Auto home on a Creality Ender 3 (and presumably all other 3D printers) moves the bed and the extrusion nozzle into a default “zero” position. In essence the bed and the extrusion nozzle are moved so they hit the end stop microswitches which signal to the controller board where the bed and nozzle are.
Mostly people assume that this is 0,0,0. In fact that is what it is set to in the factory defaults for the Ender 3. But if you look at the bed of an Ender 3 after it has been auto homed you will find that the nozzle is actually off the bed by about 5mm. It is not in the bottom left hand corner of the plate as you would expect.
The consequence of this is that if you try and use the full surface area of the plate you will be off center. In the worst case you may actually extrude plastic into thin air. As most projects are small compared to the bed size a small offset in the center of the plate is irrelevant. But still, it is an annoyance.
It is though easy to fix. Without storing the setting in eeprom you will have to repeat it after every power cycle. But you can use Pronterface (or similar) to make it permanent across power cycles.
Here’s what you have to do.
Set Home Offsets
Use the little GUI to auto-home. I.e. “Prepare->Auto home”.
Notice that after the auto-homing the extruder is off the bed y-axis by about 5mm.
Now from the on-board GUI select “Prepare→Move axis→Move Y”. Then select 1mm increments. Turn the knob and nudge the nozzle along the Y axis until it is just on the plate. Repeat with the X axis if you have to (though on mine the auto home X location was perfect.)
When it is in the right position select “Prepare→Set home offsets” Click the knob. The machine will double beep.
Now when you enter G code to go to 0,0 it will go to the new position. If you auto home now the display will show (in my case ) the Y axis location as -5
That’s it. Unless you want to make it permanent that is (which you probably do). At the moment if you turn the machine off the home offset will revert back to the auto-home position. To set it in stone you need to use Pronterface (below).
Just as an aside: As well as getting the x,y position right, if you want to reduce the nausea associated with getting the bed level then have a look at getting a CR Touch System. Easy to use and install. This supplier has a 4.3* rating on Amazon. Saves time as well as angst! If you have an old 8 bit motherboard you may well need a new 32 bit 4.2.7 board as well. See the side advert above under the “Home Offsets” title, it has both.
If you happen to be lucky enough to be aged 18-24 then you can get a really, really good deal on Amazon Prime right now. In fact it costs $0.00 (!) for the first 6 months. After that it’s half normal price. There’s also 5% cash back for a limited time. There’s much more as well. So why not make a wrinkly jealous – at least have a look! Here’s a Link to the Amazon Young Adult Prime page
Make it permanent with Pronterface
To make it permanent you need to attach Pronterface via USB. (see this post on how to get Pronterface attached through USB to the Ender 3 from an Ubuntu 18.04 set-up).
In the bottom right corner of Pronterface is a box in which you can enter G code.
Using this box first of all check the home position is set as you want. Use this G code
M503
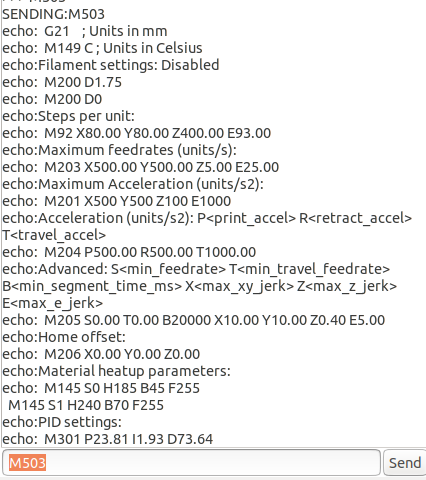
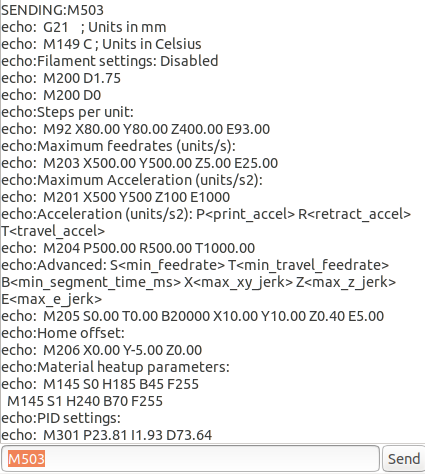
This prints out current settings. Here is the output on my machine before and after zeroing the home position. Look for “Home offset about 8 lines up from the bottom.


To make this permanent we need to flash to the on-board eeprom. Do this with the M500 G-code. It has no parameters. So just enter:
M500
For me this command never returned. But did not block further commands and seemed to work OK.
Now when you enter G1 X0 Y0 you will go to the corner of the plate rather than the off-plate position dictated by auto home. And you won’t lose the setting over a power cycle.
Remember though to use this constructively you will need to add it after auto-homing in your code like this:
G28
G1 X0 Y0
Mr David F Parker says:
I moved the cut-off switch until it stopped at the correct place.
Pete says:
In x and y ?
Jim says:
Thank you.
matthew says:
Have tried this a billion times since a firmware upgrade. I get it in the correct position then store it in the set home defaults button and the nozzle goes exactly to the same place. THen the printer starts printing at the complete back of the bed in the middle, hitting the retaining clips
what am i doing wrong if this page is not dead
Chalkie Ridge says:
Hi Matt,
If I have this right….
You set the position, store it OK and it correctly goes to the new zero position when you Auto-home?
If that is correct…
Then you find that when you go and try and print the print starts at the back (i.e. in the wrong place)?
Here’s a set of Q&A I hope may be useful
Q. So when you abort the print and then do an auto-home – does it still go to the correct new zero position?
If it does – then I’d suggest it looks like the design you are printing is cocking it up.
If it doesn’t –
Does it go to the old zero position?
If so then it looks like the zero position has not saved properly.
Q: Did you use Pronterface to save it?
Maybe check by setting the new zero position then powering off/on and checking it still goes to the new zero position with a auto-home.
I’d also try a couple of very simple designs from different sources.
Here’s one of mine that is quite trivial A seed label on Thingiverse)
Try using the gcode file first. If that cocks up then I’m clueless I’m afraid to say.
But if that’s OK try using the STL file to build your own gcode file. See if that final outcome is different (aka starts in middle at back).
If that happens then maybe its the Slicer?
I expect you’ve probably tried most of the above so I’m sorry if it may not help much.
But that’s just what I’d try. It sounds really weird that its going to the middle of the back.
Good luck!
Tell us how you get on.
Jethro says:
The Ender-3 doesn’t have a prepare menu option. The axis options are under the menu item motion, and the only option that says “offsets” makes a loud beep and takes you back to the info screen. There is no working save option.
Chalkie Ridge says:
Hi Jethro,
I can only think that you are either using a non-standard firmware or (maybe) 16 bit?
My Ender 3 is now several years old and still has the original 8 bit controller and factory issued firmware. The “prepare” option is the second item in the menu underneath the selection to return to the info screen. All other aspects in the post above work exactly as described on my standard 8 bit machine. The only issue I have regarding this post (working on at the moment) is Pronterface on my Ubuntu 22.04 machine is broken (again). I fixed it once but something I’ve changed has broken it once more.
FG says:
You can adjust the machine in Software: You can connect using Putty or Teraterm to the machine. Connect usb cable to pinter, open putty set it in serial mode put your COM port and 115200 bitrate. Set the Terminal setting to “force on” The “line discipline options”. And connect, then type anything like “G92” and will give you the values. Ender 3 is based on Marlin V2.0 G code. To change offsets of CR-touch you use “M851” command. If you type “M851 Z-2.1”, it will adjust the offset to -2.1 mm in Z direction, you can run G28 to auto-home and then your nozzle is supposed to be centred and at 5mm from the plate. Slowly lower the nozzle using G1 F100 Z3… until you can go to G1 F100 Z0 without crashing your nozzle. See how close your nozzle is to the plate to adjust “M851 Z{new value}”. Remember you have to be able to set a paper and feel little friction when the nozzle is in Z0 position. Repeat the process until you get the correct Z value in the M851 command, such that G1 F100 Z0 will be a papaer thickness from the plate. Finally save the value by using M500 command.